Thursday, December 13, 2012

Pumpkin Cupcakes


I love Thomas Keller's baked goods when I visit Bouchon Bakery from Las Vegas.  His bakery is by far my favorite because of the consistency, flavor, and quality.  I have yet to visit their shop in Beverly Hills.  Thomas Keller and Sebastien Rouxel recently released a new book, "Bouchon Bakery."


I was intrigued to try his 'Pumpkin Muffins' recipe since pumpkin is in season.  In the book, Thomas Keller & Sebastien Rouxel actually placed the cream cheese frosting in the center of the muffin, thin layer around the muffin, then wrapped an orange fondant over and nicely shaped it into a form of a pumpkin; looks amazing in the book (It would be an amazing Christmas gift for someone, just an idea).  I placed the frosting on the cupcake instead, hence, I call this a cupcake rather than a muffin.  This recipe is perfect, does not need any tweaking at all.  Needless to say, I would love to have the opportunity to work for them if they're looking for bakers!  Enjoy!

Pumpkin Cupcakes
Yield:  11 Regular Cupcakes 
(Adapted from:  Thomas Keller & Sebastien Rouxel "Bouchon Bakery")

Cake Batter
Ingredients
1 ¼ cups plus 3 tablespoons (200 g) - all-purpose flour
½ teaspoon - baking soda
¾ plus 1/8 teaspoon - ground cinnamon
¼ teaspoon - ground cloves
½ teaspoon - freshly ground nutmeg
Pinch of ground allspice
½ teaspoon kosher salt
1 cup plus 2 tablespoons (222 g) - granulated sugar
¼ cup plus 3 tablespoons (100 g) - canola oil
¾ cup plus 2 tablespoons (210 g) - pure canned pumpkin puree or fresh pumpkin puree
2 large (100g) - eggs
½ cup plus ½ tablespoon (80 g) - golden raisins (optional)

Cream Cheese Frosting
Ingredients
8 ounces (226 g) - cream cheese, at room temperature
2/3 cup (76 g) - confectioners’ sugar
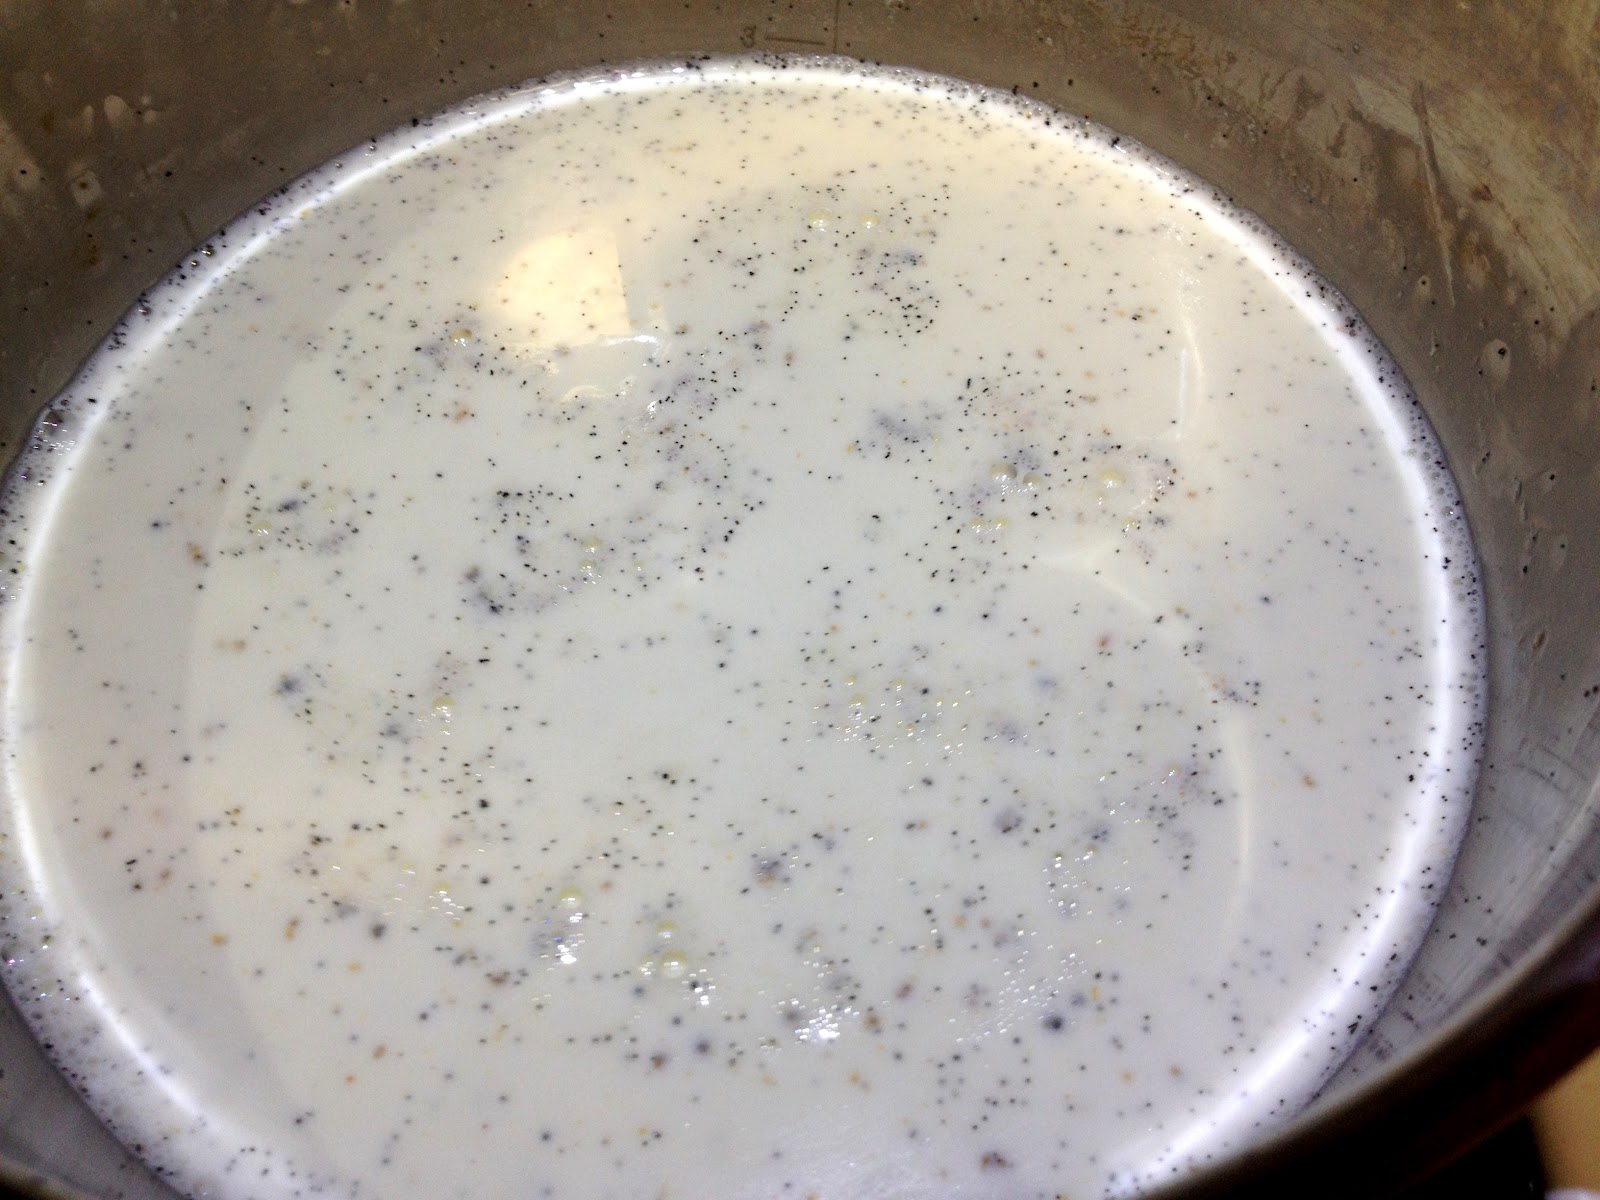
¼ vanilla bean - split lengthwise

Cake Batter Procedure
1. Place the flour in a medium bowl. Sift in the baking soda, cinnamon, cloves, nutmeg and allspice. Add the salt and whisk to combine. 

2. Combine the sugar and oil in the bowl of a stand mixer fitted with the whisk attachment and mix on low speed for about 1 minute. Add the pumpkin, increase the speed to medium-low, and mix for about 1 minute, until smooth. Reduce the speed to low and add the eggs in two additions, mixing for about 15 seconds after each, or until just combined. 

3. Add the dry ingredients in two additions, mixing on low speed for about 15 seconds after each, or until just combined. Remove the bowl from the mixer stand and scrape the bottom of the bowl to incorporate any dry ingredients that may have settled there. Fold in the raisins, if using. Transfer the batter to a covered container and refrigerate overnight, or for up to 36 hours. 

4. Preheat the oven to 425°F. Line a 12-regular cup muffin pan with paper liners and spray the papers with non-stick cooking spray. 

5. Transfer the batter to a disposable pastry bag and cut ½ inch of the tip from the bag; or use a large spoon. Pipe or spoon the batter into the papers, stopping ½ inch from the top (140 grams in each).  

6. Put the pan in the oven, lower the oven temperature to 325°F, and bake for 30 minutes, or until the muffins are golden brown and a skewer inserted in the center comes out clean. Set the pan on a cooling rack and cool completely.

Frosting Procedure
1. Place the cream cheese in the bowl of a stand mixer fitted with the paddle attachment and mix on low speed until smooth, about 2 minutes. Scrape down the sides and bottom of the bowl, add the sugar, and pulse on the lowest speed to combine. Scrape the seeds from the vanilla bean, add them to the mixture, and mix for 2 to 3 minutes, until completely smooth. The frosting can be used at this point or refrigerated for up to 3 days. If it has been refrigerated, let it sit at room temperature until just cool to the touch, then transfer to a mixer fitted with the paddle attachment and beat until smooth.


Wednesday, September 19, 2012

Kaffir Lime & Rosemary Roasted Chicken Thighs


Kaffir Lime & Rosemary Roasted Chicken Thighs

Ingredients:
5 - Chicken Thighs
1 Tbsp - Salt
2 Cups - Cold Water

Herbal Rub
3 Sprigs - Rosemary, finely chopped
1 tsp - Chili Pepper Flakes
1tsp - Salt
1 tsp - Black Pepper
5 Cloves - Garlic
2 Tbsp - Olive Oil
4 - Kaffir Lime Juice or 2 Lemon Juice, keep lime for roasting with vegetables later

Vegetables
2 - Medium Onions, diced
5 - Red potatoes, diced (optional)
5 - Carrots
pinch - Salt
pinch - Black Pepper
1 - Sprig of green onions, finely chopped (optional)

Oil - for pan

Procedure:
1.  Mix cold water with salt, soak chicken thighs for 30 minutes.  Rinse, pat dry and cut three slits on each thigh.  Set aside.
2.  Combine all Herbal Rub ingredients into a mortar without olive oil and Kaffir lime juice, mortar ingredients altogether, then add the olive oil, kaffir lime juice and mix.  Reserve 1 Tbsp of mixture aside (this will be used to sautéed the vegetables with).  Marinate chicken thighs for 30 minutes with mixture.
3.  Heat 1 tsp olive oil in roasting pot (can use cast iron), pan fry chicken thighs on  each side until golden brown, do not need to cook through (make sure you get a nice color on the top of the chicken thighs). 
4.  Remove chicken thighs from pan, continue to cook the rest of thighs.  If pan have excess oil from the chicken thighs fat, remove from pan and discard appropriately.
5.  Add carrots,  onions, the remaining herbal rub mix, salt, black pepper and sauté until onions are translucent.  If you would like to add red potatoes, make sure to pre-boil them until slightly cooked, but not too mushy and add altogether. 
6.  Place kaffir limes (remaining from juicing it) into pot of vegetables, add the chicken thighs and roast in oven at 425F for 30-40 minutes or until the thermometer reads 180F.
7.  Serve over a bed of fluffy white rice, brown rice, or quinoa.


Thursday, September 6, 2012

Slow Cookin' Tri-Tip Roast


Slow Cookin' Tri-tip Roast
Ingredients
3 1/4 lb - Tri Tip Roast
2 tsp - Salt
4 Cup - Cold Water

Dry Rub
8 Cloves - Garlic, minced
3 Tbsp - Premium Soy Sauce, (preferred Lee Kum Kee Brand)
2 1/2 tsp - Dry Onion Powder
2 1/2 tsp - Garlic Powder
1 1/2 tsp - Cayenne Pepper (optional)
1 tsp - Chili Pepper Flakes (optional)
1 tsp - Sweet Paprika
1 tsp - black pepper, fresh ground
1 1/2 tsp - Salt
1 Tbsp - Olive Oil

Vegetables
1 Large - Onion, chopped
2 Large - Russell Potato, 1/2" cubed (optional)
2 Large - Carrots, chopped (optional)

Liquid Ingredient
1 (28oz) Can - Crushed Tomatoes (preferred Fresh & Easy Brand w/ Basil)
1 1/2 Cup - White Wine
2 Tbsp - Brown Sugar

Procedure:
1.  Mix 4 cups of water and salt together, place tri tip roast in water and soak for 30 minutes.  Remove tri tip roast from salt water, rinse, then pat dry, and set aside.

2.  Mix Dry rub altogether, then split in half.  1st half will be used to rub the tri tip; 2nd half will be used to sautee the onions.

3.   Use 1/2 the dry rub onto the tri-tip, coat all over.  Heat pan and add 1 tsp olive oil, pan seared tri tip in all sides, until brown (10 minutes).  Place tri tip into slow cooker pan.

4.  Add onion into pan, the rest of the dry rub and sautee until translucent.  Add liquid ingredients and bring to a simmer.  Then transfer liquid into the slow cooker.  Set the slow cooker to high heat and cook 6-8 hours (recommend to do this the night before).

5.  Change slow cooker to keep warm and add potatoes and carrots, cook for additional 7-9 hours (recommend to do this before leaving to work for the day).   Serve over rice.


Tuesday, July 24, 2012

Cinnamon Churros


Churros is one of my husband's favorite desserts. Every time we go to Costco or Disneyland, he loves to grab one on the go. I wanted to experiment in doing a baking version of this lovely desserts and to my surprise, it tastes amazing and allow me to feel less guilty when indulging it. I hope you'll enjoy this as much as I do!


Cinnamon Churros
(Recipe adapted from:  www.recipe.com; Procedure by hachi-patisserie)

Ingredients:
1 Cup - Water
1/3 Cup - Butter
2 Tbsp - Brown Sugar
1/2 tsp - Salt
1 Cup - All Purpose Flour
1 Egg
1/2 tsp - Vanilla Extract

1/4 Cup - Sugar
3/4 tsp - Ground Cinnamon

Procedure:

1.  Combine water, butter, brown sugar, and salt in non-reactive pan.  Bring to a boil.
2.  Turn off stove, pour in 1 cup of all purpose flour and stir vigorously with a wooden spoon until combine into a dough form.
3.  Let cool for 10 minutes, add egg and vanilla extract and continue to beat the mixture with a wooden spoon until incorporated.
4.  Transfer mixture to a decorating bag fitted with a large star tip. Line a baking sheet waxed paper.  Pipe 4x1-inch logs onto prepared baking sheet, refrigerate for 10 minutes before baking.
5. Preheat oven to 375F, place baking sheet into oven and bake for 45-55 minutes, or until center of dough is done (use toothpick to check if it comes out clean when poked).
6.  Combine Sugar and ground cinnamon altogether and add the baked churros into the cinnamon sugar right out of the oven to coat evenly.
7.  Serve with melted chocolate (ideally with mexican chocolate).  Enjoy!


 *NOTE:  DEPENDING ON THE SIZE OF YOUR STAR TIP, MINE YIELD APPROXIMATELY 16 - 4" CHURROS.


Spicy Salsa Verde


When I buy salsa verde from a jar, it's usually this green color that is more in a darker shade.  I decided to make my own this time since the amount of ingredients were easy to follow, this recipe is delicious and adding avocado gives the spicy salsa verde a very creamy texture and taste.  You can always add spicy salsa verde to your rice, or quinoa recipe.  Simply substitute 1/2 from its liquid ingredient.  Also, you can always use this to cook diced chicken with and serve over rice...Mmmm.

Spicy Salsa Verde
(Adapted from:  Better Homes Magazine:  July 2012 MEXICAN)
Ingredients:
2 cups - Tomatillos, peeled and chopped (about 5)
2 - Avocadoes, halved, peeled, and seeded
1/2 cup - Onion, chopped (1 Medium)
1 cup - Snipped fresh Cilantro
1 - Jalapeno, chile pepper, stemmed, seeded, and cut up
1/2 cup - Water
1/3 cup - Lime Juice
1/2 tsp - Sugar
1/4 tsp - Salt

Procedure:
1.  In a food processor combine tomatillos, avocados, onion, cilantro, and chile pepper.  Cover and pulse with several on/off turns until all ingredients are finely chopped.  Transfer mixture to a medium bowl.
2.  Stir in the water, lime juice, sugar, and salt.  Cover and chill for at least 2 hours.  Salsa keeps in the refrigerator for up to 3 days.  Makes approximately 3 3/4 cup.

I made quinoa with the Salsa Verde!


Monday, July 9, 2012

Vanilla Bean Ice-Cream w/ Macerated Strawberries


Vanilla Bean Ice-Cream w/ Macerated Strawberries
Macerated Strawberries
Ingredients:
1/2 lb - Strawberries, hulled and quartered
1/8 Cup - Brown Sugar

Procedure:
1.  Combined brown sugar and quartered strawberries together to macerate.

Vanilla Bean Ice-Cream
Ingredients:
1 3/4 Cup - Heavy Cream
3/4 Cup - Whole Milk, or 2%
1/4 Cup - Sugar
1 Vanilla Bean
1 tsp - Salt

5 Large - Egg Yolks
1/4 Cup - Sugar
2 tsp - Vanilla Extract

1.  Macerate Strawberries, set aside.

2.  Combine Heavy cream, milk, salt, 1/4 cup sugar.  Split the vanilla bean and bring to simmer.

 3.  Remove from heat, let seep for 30 minutes for flavoring.

 4.  Mix egg yolk with 1/4 cup sugar until light yellow.

 5.  It should have a nice ribbon consistancy.  In the meantime, place heavy cream and vanilla pot back onto the stove, and bring to simmer, slowly add 1/2 cup of heavy cream mix to egg yolk mixture and whisk, repeat one more time.

 6.  Pour the yolk mixture to the remaining heavy cream mix and stir over medium heat until the back of your wooden spoon is nicely coated.  Add 2 tsp Vanilla Extract.

 
7.  Pour mixture into a sieve and chill for 2 hours or overnight, then follow ice-cream maker instruction.

 8.  Enjoy!  As you can tell, I couldn't resist the wait of an extra 2 hours after the ice-cream maker mixing, hence the soft ice-cream consistency.  Delicious!

Sunday, July 8, 2012

Plum Galette


I got these lovely plums from my sister's friend when they went to Bakersfield to visit his family.  Plums flesh are very sweet when ripped, while their outer skin keeps the sour taste to the fruit itself.  This fruit will be delightful if made as a galette.  Enjoy!


Pate Brisee Dough
Ingredients:
2 1/2 Cup - All Purpose Flour
2 Stick (8oz) - Unsalted Butter, cold and cut into 1/4 inch cubes
1/2 tsp - Salt
1Tbsp - Sugar
1/4 to 1/2 Cup - Ice Cold Water


Procedure:

1. Combine all purpose flour, salt, and sugar until combined.  Pulse in butter until pea size, slowly add the ice water until combine, do not over mix.  (When you over mix, this will make the butter cream into the flour rather than having lumps to create the crust with a nicer flaky taste).  
2.  Round the dough into disc shape, wrap and refrigerate for at least 30 minutes before rolling the dough.

Plum Filling
Ingredients:
(8-10) - Small Plums, sliced into 8th
1/4 Cup - Brown Sugar
1/4 Cup - Granulated Sugar
1/8 Cup - Corn Starch

Sugar Crystals - for garnish, the galette edges

Procedure:
1.  Mix sliced plums with sugars and cornstarch and let sit for 20 minutes to macerate.
2.  Roll 2/3 of the pate brisee dough and cut out 6" rounds.
4.  Place plum filling on each dough, found the ends up, brush the top of edge with water and sprinkle sugar crystals.
5.  Bake at 400 degrees for 30 minutes and then reduced to 375 degree for 10 minutes.
6.  Serve warm with a scoop of Vanilla Ice-Cream, or enjoy as is.


Thursday, June 28, 2012

Butterscotch & Chocolate Chip Cookies


Butterscotch flavor reminds me of the lovely candy that is circular in shape while wrapped in a yellow cellophane wrapping.  Every Halloween season as a child, my brother and I would encounter these butterscotch candies from our trick or treating.  Butterscotch is like eating caramel and butter at the same time and lets just say, it's not for everyone.  When I came across these chips from Nestle, I couldn't resist and purchase a bag!  Simply add them to your favorite Chocolate Chip Cookie recipe!  Enjoy!


Butterscotch & Chocolate Chip Cookies
Yield:  (19) - 3" Cookies


Ingredients:
8 oz. - Butter
1 Cup - Granulated Sugar
1 Cup - Dark Brown Sugar, packed

2 Large - Eggs
2 tsp - Vanilla Extract

3 Cup - All Purpose Flour
1 tsp - Baking Soda
1 1/2 tsp - Baking Powder
1 1/2 tsp - Kosher Salt

4 oz. - Chocolate Chips
4 oz. - Butterscotch Chips

Procedure:
1.  Sift all purpose flour, baking soda, baking powder, kosher salt, and set aside.
2.  Cream butter until light, add both sugar, mix to combined.
3.  Add one egg at a time, and then add the vanilla extract until combined, do not over-mix.
4.  Add dried ingredients in two part and mix until combined.
5.  Fold in the Butterscotch and Chocolate chips until evenly distributed.
6.  Use desired scoop and place cookie dough in freezer for 20-30 minutes (this process allows the cookie to hold its shape and not melt the butter too fast).
7.  Pre-heat oven at 350F, arrange cookies at least 1 1/2 inch apart.  Bake for 20 minutes!

Taste delicious when warm!!!! MMmmmm....

Monday, June 18, 2012

Mini Sangria Paletas


I came across this recipe from Amy Atlas's new book called, "Sweet Designs:  Bake It, Craft It, Style It."
Amy Atlas has it listed as 'Sangria on a Stick."


Tuesday, May 8, 2012

Buttermilk Panna Cotta


I've recently received a dessert book as a bride to be gift called, "Meitte - By:  Meg Ray."  Thanks to my friend TC, I've been looking forward to buying this book as part of my collection.  When I flipped through it, I already fell in love with the pretty scalloped pages on the edge.  Also, many of Meg Ray's recipes are using a size 6" cake pan.  Size 6"-8" cakes are ideal for me, I look forward to experimenting with this book!

The first recipe I wanted to try was the Buttermilk Panna Cotta.  Why, may you ask?  Well, first of all, I have a carton of buttermilk that is about to expire and second of all, I have a box of strawberries that are going to go bad soon if I don't use them.  I love panna cotta, it's like a creamy jello but I think adding buttermilk may give this panna cotta a tang to the dessert.  I hope you'll enjoy this as much as I did.  Tastes like a greek yogurt with fruits but with a smoother texture.


Panna Cotta
Recipe Book:  Miette 
By:  Meg Ray
Yield: 12 (2oz) Cups/ 6 (4oz) Cups

Ingredients:
1/3 Cups - Heavy Cream
1tsp (1/2 Packet) - Gelatin (When I add 1 tsp, it seems as the gelatin didn't set as firm as I like it to be, if you like it firmer, try adding an extra 1 tsp.  I think the whole shifting process remove some of the gelatin too)
1 2/3 Cups - Heavy Cream
1/3 Cups - Granulate Sugar
1 - Vanilla Bean or 2 tsp - Vanilla Extract
2 Cups, 2 Tbsp - Buttermilk
Diced Strawberries, for garnish

Procedure:
1.  Place 1/3 Cup of heavy cream and 1 tsp of gelatin and bloom for 10 minutes.
2.  Place 1 2/3 Cup of heavy cream, sugar, vanilla bean and bring to a boil.
3.   Turn off stove, add the bloomed gelatin & cream mixture to the pot and stir.  
4.  Add Buttermilk and whisk until combined.
5.  Place mixture through a medium sieved and poured into your desired mold.
6.  Wrap with plastic wrap and refrigerate overnight.
7.  Top the buttermilk panna cotta with strawberries or any other fruits that is seasonal.

Monday, April 23, 2012

Blueberry Muffins


My mommy bought me blueberries.  Who doesn't love blueberry muffins in the morning, especially when it is made in a large muffin tin!  I came across this recipe from a book I have recently purchased.  It's a lovely book, hope you'll enjoy too!  Nothing beats classic recipes, it's the backbone in all desserts!!! (:


Blueberry Muffins
By:  Cheryl & Griffith Day; Forwarded by:  Paula Deen

Ingredients:
2 Cups                    All Purpose Flour
1 Cup                      Granulated Sugar
1 Tbsp                    Baking Powder
1/2 tsp                   Fine Sea Salt
1/4 tsp                   Ground Cardamom
1/4 Cup                  Canola Oil
4 Tbsp                    Unsalted Butter, melted
1/2 tsp                   Pure Vanilla Extract
2 Large                   Eggs
3/4 Cup                  Whole Milk
1 Cup                      Fresh or Frozen Blueberries
1/4 Cup                  Coarse Sanding Sugar

Procedure:
1.  Position rack in the lower third of the oven and preheat the oven to 350°F.  Lightly spray 12 large muffin cups with vegetable oil spray or line them with paper muffin cups.

2.  In a large mixing bowl, whisk together flour, sugar, baking powder, salt, and cardamom, until combined.

3.  In a separate bowl, whisk together the oil, butter, vanilla, eggs, and milk.  Make a well in the center of the dry ingredients, pour in the liquid ingredients, and mix until combined (do not overmix).  Gently fold in the blueberries, using a few strokes as possible.  (I usually like to coat my blueberries with flour beforehand so they do not sink all at the bottom of the batter).

4.  Scoop the batter into the muffin cups, filling them 2/3 full.  Sprinkle the tops with sanding sugar.

5.  Bake for 25-30 minutes, until the muffins are golden brown.    The tops should be firm to the touch and toothpick insert should come out clean.  Remove from the oven and let cool for 10 minutes.

6.  The muffins can be stored in an airtight container for up to 2 days.


Thursday, April 19, 2012

Coconut Cake


It's been awhile since I've baked anything.  Who knew when my husband gives up sweet for lent, It had hindered me from baking since I did not have a taste tester.  Lets hope he gives up something else next year!  I came across a recent Saveur Magazine with a profound slice of red velvet cake as the cover of the spread.  Looks like they are hitting cake recipes back to the basics.  


My Husband loves coconut, and it would be lovely to start the week with a coconut cake recipe.  I've actually made mine as a cupcake and cut the recipe in half.  With the frosting listed below, there's enough to add additional grated coconut to make macaroons!  The recipe below yields exactly 12 cupcakes, or you can try to make a typical 8" cake!  Enjoy laaah.


Coconut Cake
Recipe Adapted from:  Saveur Magazine March 2012 Issue
Reciped Provided by:  Associate Food Editor Ben Mim's Grandmother, Jane Newson
(Note:  I have reduced the ingredient amount by half to bake them in a 6" cake pan versus an 8" cake pan or you can always make cupcakes!!!!)

For the Cake:
8 tbsp.                    Unsalted Butter, softened, plus more for pans
1 Cup                      Sugar
2 1/2                      Eggs
1 1/4 Cups             Cake Flour, plus more for pans, sifted
1/2 tsp                   Baking Soda
1/2 tsp                   Kosher Salt
1/2 Cup                  Buttermilk
1 1/2 tsp                Vanilla Extract

For the Frosting:
2                              Egg Whites
1/4 tsp                   Cream of Tartar
1 1/8 Cup              Sugar
1/8 Cup                  Corn Syrup
1/2 tsp                   Kosher Salt
1 tsp                       Vanilla Extract
3/8 Cup                  Coconut Water
1 1/2 Cup              Freshly Grated Coconut

Procedure
For the Cake:
1.  Heat oven to 350.  Butter and flower two 6" cake pans, and set aside.  Whisk together flour, baking soda, and salt in a bowl, set aside.  Whisk together buttermilk and vanilla in a bowl; set aside. 
2.  In the bowl of a stand mixer fitted with a paddle, cream butter and sugar on medium-high speed until pale and fluffy, about 3 minutes.  Add eggs one at a time, beating well after each addition.
3.  On low speed, alternately add dry ingredients in 2 batches and wet ingredients in 2 batches.  Increase speed to high, and beat until batter is smooth, about 5 seconds.
4.  Divide batter between prepared pans, and smooth top with a rubber spatula; drop pans lightly on a counter to expel large air bubbles.
5.  Bake cakes until a toothpick inserted in the middle comes out clean, about 35 minutes. 
6.  Let cake cool for 20 minutes in pans; invert into wire racks, and let cool.  Using a serrated knife, halve each cake horizontally, producing four layers, set aside.

For the Cake:
1.  Place egg whites and cream of tartar in the bowl of a stand mixer fitted with a whisk, and beat on medium-high speed until soft peaks form; turn mixer off. 
2.  Bring sugar syrup, salt, and 1/2 cup tap water to a boil in a 2-qt. saucepan over high heat, stirring to dissolve sugar, attach a candy thermometer to side of pan, and cook, without stirring, until thermometer reads 250, 4-5 minutes.  Turn mixer to medium speed, and very slowly drizzle hot syrup into beating egg whites. Add vanilla, and increase speed to high; beat until meringue forms stiff peaks and is slightly warm to the touch, about 3 minutes.

To Assemble:
1.  Place one layer on a cake stand, drizzle with 1 1/2 tsp coconut water, spread with 3/4 cups frosting, and sprinkle with 1/4 cup grated coconut, top with another cake, drizzle, frost, and sprinkle (repeat until cake slice 3).
2.  Cover top and sides with remaining frosting, and cover outside of cake with remaining coconut, pressing it lightly to adhere; chill cake to firm frosting.  Serve chilled or at room temperature.